Sunday, December 30, 2018

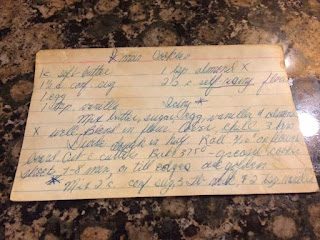
Xmas Cookies

Christmas cut-out cookies are classics. Mom always made these cookies and would put us kids to work in rolling out the dough, cutting out the cookies, and carefully lifting the cookies onto the cookie sheet. Then, Mom would further occupy our Christmas break by making us frost and decorate these cookies. But these time-consuming cookies are so delicious, that it is worth the time to make them.

This recipe is quite similar to this one. But one important difference for this recipe is that it uses confectioner's sugar, resulting in a lighter cookie. The dough needs to be made ahead and chilled for a bit. The chilled dough is overall easier to work with, so if the dough becomes too sticky, put it back in the refrigerator for a bit. The recipe calls for self-rising. To make your own self-rising flour, add 1/2 teaspoon baking powder and 1/2 teaspoon salt for each cup of all-purpose flour.

Xmas Cookies 
  • 1 cup soft butter
  • 1 1/2 cup confectioner's sugar
  • 1 egg
  • 1 tsp. vanilla
  • 1 tsp. almond extract
  • 2 1/2 cups self-rising flour
  • Confectioner's Sugar Icing 
Mix the butter, sugar, egg, vanilla, and almond extract well. Blend in flout. Cover and chill for 3 hours. Divide the dough in half. Roll out one half to 3/16 inch thickness on a floured surface. Cut with cookie cutters. Bake at 375 for 7-8 minutes or until the edges are golden. Cool on a wire rack.

Make the icing by combining 2 cups confectioner's sugar with 3 tablespoons of milk and 2 teaspoons of vanilla. Adjust the amount of sugar or milk to get desired consistency. Add food coloring, if desired. Frost and decorate cookies. Enjoy!


Saturday, December 22, 2018

Chocolate Pixies

For me, Christmastime means lots of delicious cookies. Chocolate Pixies are a classic. A simple google search reveals many websites with this exact or near exact recipe. So I cannot tell where or when this cookie originated. Some recipes call them chocolate crinkle cookies. Some recipes leave out the walnuts. But the recipe below seems to be a popular version of these cookies.

These Chocolate Pixies should not be confused with the Fannie May Chocolate Pixie candy, which consist of pecans, caramel and chocolate. The cookies are somewhat a mix of cookie and brownie. The recipe itself is easy and the resulting cookies look so nice. The Chocolate Pixies are a great choice for holiday parties or cookie exchanges.

Chocolate Pixies 
  • 1/2 cup butter
  • 4 ounces unsweetened chocolate
  • 4 eggs
  • 2 cups sugar
  • 3 cups flour
  • 2 tsp. baking powder
  • 1/2 tsp. salt
  • 1/2 cup chopped walnuts
  • confectioner's sugar
In a saucepan, melt butter and chocolate over low heat. In a large bowl, beat eggs and sugar. Gradually drizzle in the chocolate mixture into the egg mixture. Stir together flour, baking powder and salt. Add walnuts. Chill dough for at least 30 minutes. Shape into one-inch balls and roll in confectioner's sugar. Place on a cookie sheet leaving some space for cookies to spread. Bake at 300 for 15 to 18 minutes. Cool on a wire rack. Enjoy!


Monday, December 3, 2018

Gingersnaps

When December rolls around, it is time for Christmas cookies. Mom has an entire separate recipe box filled with just cookie recipes. Mom's gingersnaps recipe caught my eye this year. When I was a kid, I did not like gingersnaps. I was not used to molasses, so maybe that is the flavor that was hard to like. Or maybe it was the ginger that was too much for me. But now that I am an adult, I love all the flavors found in gingersnaps.

Gingersnaps are an old-fashioned cookie, but are so easy to make. And, they come out so perfectly that others will ask you if they are purchased from a store. The dough does need to chill, so it is best to make the dough the day before and let it chill in the refrigerator overnight. Mom's recipe calls for cloves, but since I did not have any, I simply left it out of the recipe.

Gingersnaps 
  • 3/4 cup butter
  • 3/4 cup brown sugar
  • 1 egg
  • 3/4 cup molasses
  • 3 cups flour
  • 1/4 tsp. salt
  • 2 tsp. baking soda
  • 1 tsp. cinnamon
  • sugar for coating the cookies
Blend together all the ingredients except the sugar for coating. Chill the dough overnight. Roll tablespoons of dough into balls. Roll each ball in the sugar to coat. Place on a cookie sheet about two inches apart. Bake at 375 for about 10 minutes. Cool on a wire rack. Enjoy!

Sunday, November 11, 2018

Pineapple Casserole

My niece-in-law, Christen, makes this delicious casserole for family parties. Because she and Rich host the entire family for Thanksgiving, I have come to think of this dish as a new classic Thanksgiving dish. The picture below is the recipe as it appears in Christen's recipe book. This year, instead of hoping that there will be leftover Pineapple Casserole to take home, I just made it myself.

I don't know what it is about casseroles, but I just love them. Maybe it is the seemingly incongruous ingredients all thrown together into a pan that usually results in a delicious dish. Maybe it is because casseroles are so easy to make. Whatever the reason, I usually love casseroles. This Pineapple Casserole in no exception. It is sweet and salty, crunchy and creamy all at the same time. It is almost a dessert. Because it is so easy to make, give this casserole a try. Next time I make this casserole, I might even add some nuts, such as macadamia nuts, to the topping.

Pineapple Casserole 
  • 1 cup sugar
  • 6 Tbsp. flour
  • 2 cup shredded cheddar cheese
  • 2 20 ounce cans chunk pineapple
  • 1 cup Ritz cracker crumbs
  • 1 stick (8 Tbsp.) melted butter
Preheat oven to 350. Grease a casserole dish. In a mixing bowl, mix the flour and sugar together. Blend in the shredded cheese.  Reserve the juice from the canned pineapple; blend the pineapple with the cheese mixture. Pour the contents into the dish. 

Combine the Ritz cracker crumbs, melted butter, and 6 tablespoons of pineapple juice. Spread on top of the casserole. Bake for 25 to 30 minutes.

Sunday, November 4, 2018

Day of the Dead Bread

Day of the Dead is celebrated on November 2, when offerings are made to deceased relatives. The holiday is primarily celebrated in Mexico and coincides with Halloween and All Souls' Day. The food offerings are meant to honor the dead, and families often hold picnics at their family member graves. There are a variety of traditional foods, including candy skulls, tamales, and other treats. But I personally love Day of the Dead bread, known as Pan de Muerto. I usually buy some at a local Mexican bakery. It is always delicious, but I thought I would try making it myself this year.

Day of the Dead bread is a sweet egg bread. It is often covered in colored sugar, but I skipped the sugar. I made a single large loaf, but smaller individual sized buns could be easily made. During the second rise, set aside some of the dough for the decorative elements on top of the bread. I attempted to make crossbones, but sometimes the extra dough is shaped into a skull. I used anise and orange zest. The anise is what makes this bread special. Sometimes cinnamon is added to the dough.

 Day of the Dead Bread 
  • 1/2 cup lukewarm milk 
  • 4 Tbsp. butter, softened 
  • 1/4 cup sugar 
  • 1 tsp. salt 
  • 2 tsp. instant yeast 
  • 3 large eggs, divided 
  • 3 cups flour 
  • 1 tsp. anise seed 
  • 1 tsp. orange zest
Combine all the ingredients except one egg white. Set aside the egg white in the refrigerator for the egg wash. When all the ingredients are blended, knead the dough for a few minutes until the dough is smooth. Place the dough in a lightly greased bowl, cover, and allow to rise for about two hours. The dough will increase in size, but will not quite double. 

Break off a piece of dough a little larger than a golf ball and place that dough in the refrigerator. Shape the remaining dough into a ball, place the dough into a greased 9-inch round pan, and flatten the dough. Allow the dough to rise, for about two hours.

Heat the oven to 350. Using the egg white mixed with a tablespoon of water, brush the top of the bread with the egg wash. Using the set aside dough, form a decorative shape, such as crossbones and place on top of the bread. Brush the entire top of the loaf with the egg wash. Bake the bread for about 30 to 35 minutes. Allow to cool. Enjoy!

Thursday, November 1, 2018

Pumpkin Chocolate Chip Cookies

Although this recipe is not from Mom, it has become a family favorite. I love just about all things pumpkin. I found a variation of the recipe somewhere that I can no longer recall the source. Since I first made this recipe, I made several adjustments to suit my preferences. These delicious cookies are now popular at family parties, especially in the fall when pumpkin is everywhere. Even people who don't particularly like pumpkin like these cookies.

This recipe makes a lot of cookies. Fortunately, these cookies freeze well, so they can be enjoyed for a long time. And the cookies stay soft and moist, even after being defrosted. I prefer using milk chocolate chips, but use any kind of chips you like. I really like the combination of cinnamon, ginger, and nutmeg and you can use more or less of each spice to suit your preferences.

Pumpkin Chocolate Chip Cookies 
  • 1 cup butter, softened
  • 1 1/2 cup brown sugar
  • 2 large eggs
  • 1 tsp. vanilla
  • 1 cup pumpkin puree
  • 3 cups flour
  • 2 tsp. baking soda
  • 1 tsp. ground cinnamon
  • 1/2 tsp. ground ginger
  • 1/4 tsp. ground nutmeg
  • 2 cups chocolate chips
Preheat the over to 350. Beat butter and sugar until light and fluffy. Beat in the eggs. Add vanilla and pumpkin puree. Mix in baking soda, cinnamon, ginger, and nutmeg. Mix in the flour until fully blended. Stir in the chips. Scoop spoonfuls of dough onto cookie sheets. Bake for 10 to 13 minutes. Allow to cool on wire rack. Enjoy!

Saturday, October 20, 2018

Megan's Pulled Pork

A while back, Meg made pulled pork for a regular Saturday night at Mom's house. It was delicious. Her secret was cooking the pork in a slow cooker soaking in root beer. It turns out that this method is not so secret, but in my book, Meg gets credit for it. Be sure to use regular root beer because the sugar, as opposed to artificial sweetener, is what is soaked into the meat.

The key to this recipe is time, not effort. Just put the pork in a slow cooker with root beer for a few hours, shred the pork, then add barbecue sauce. Pulled pork can be eaten on its own, as a sandwich, on a salad, or any other way you want. Because the slow cooker can be set on warm, this is a great recipe for a party.

Megan's Pulled Pork 
  • 3 to 4 pound pork shoulder
  • 1 can root beer
  • 1 bottle (18 oz) barbecue sauce
Place the pork and root beer in the slow cooker. Cook on low for 8 hours or high for about 4 hours. Remove the meat and discard the cooking juices. Using forks, shred the pork. Return the meat to the slow cooker, add barbecue sauce and cook on low for about 30 minutes. Enjoy!

Sunday, October 14, 2018

Mint Pesto

As I've mentioned before, Mom's mint plants have taken over her garden. So, with the abundance of mint, I have been making this mint pesto. It is amazing how much mint it takes to make just a little bit of pesto. Rather than complaining about too much mint, I'll just keep making this pesto recipe to use up all the mint. This pesto is delicious on crackers, but I have been adding it to salads instead of salad dressing. However you serve it, you'll enjoy this pesto.

Although pesto is traditionally made with basil, you can just substitute mint for an excellent pesto. The name pesto originates from the Italian word that means to pound or crush. Back in the day, pesto was made using a mortal and pestle. Luckily for us, we have food processors that take so much of the work out of making pesto. Also, I substituted slivered almonds for pine nuts, which are more commonly used in pesto. The amounts listed below are approximate amounts; you may need to adjust to suit your preferences. The pesto will last about a week in the refrigerator or several months in the freezer.

Mint Pesto
  • 2 cups mint leaves
  • 1/2 cup nuts, such as almonds or pine nuts
  • 1/8 cup parmesan cheese
  • 1/2 cup olice oil
  • 1 tsp. lemon juice
  • dash of salt
Add all the ingredients to a food processor. Blend until the ingredients are broken down and blended to your desired consistency. Enjoy!


Monday, October 1, 2018

Mint Chocolate Chip Zucchini Bread

This recipe is not a family recipe, although zucchini bread is a favorite especially when made by Jenny. But this recipe uses the fresh mint that is prolifically growing in Mom's garden, so I think it qualifies for sharing here. I wasn't sure that that mint chocolate chip would go with zucchini, but this recipe proves that it does.

The mint leaves blend in well with the zucchini in this bread, so you won't notice the actual mint leaves too much. But the mint flavor comes through nicely. The next time I make this recipe, I might use even more mint. I might also use fewer chocolate chips. As much as I love chocolate, I think I added too much, so I adjusted the recipe below.

 Mint Chocolate Chip Zucchini Bread 
  • 1 1/2 cup all-purpose flour
  • 1/2 tsp. baking soda
  • 1/4 tsp. salt
  • 1/4 tsp. baking powder
  • 1 cup sugar
  • 1 cup finely shredded zucchini
  • 1/4 cup cooking oil
  • 1 egg
  • 1 cup chopped fresh mint
  • 1/2 cup chocolate chips
Combine the flour, baking soda, salt, and baking powder. Blend in the sugar, zucchini, cooking oil, and egg until well mixed. Fold in the mint and chocolate chips. Pour batter into a greased 8x4 loaf pan. Bake at 350 for 50 to 60 minutes or until a toothpick inserted in the center comes out clean. Cool bread before slicing. Enjoy!

Sunday, September 23, 2018

Lefse

I have strong childhood memories of Lefse, but Lefse is not one of my family's recipes. Lefse is a soft potato flat bread that can be made with leftover mashed potatoes. I first met Stephanie Schmidt in sixth grade at Hauser Junior High. Stef's family had a wonderful tradition of making Lefse in large batches, usually around the holidays. Lefse production was a family affair, and each person in the Schmidt Family was assigned to a specific task, such as rolling out the dough or manning the griddle. My specialty was eating the Lefse. Often, the Lefse is spread with butter, sprinkled with sugar and cinnamon and rolled up. But Lefse can be eaten with any sweet or savory filling, so its uses are endless. Lefse is especially delicious fresh off the griddle, but it can be stored in the refrigerator for a few days or freezer for a few months, then just warmed up when you want to enjoy it.

Lefse is a Norwegian treat that is especially common in Minnesota. Earlier this year, I spent a week in Minnesota and was reminded of the deliciousness of Lefse. I knew I had try making it, even though I did not have some of the special equipment. Lefse is often made on a large circular griddle that results in a 16-inch round Lefse. I only had a small griddle, so I made about a 10-inch round Lefse. There is a traditional grooved rolling pin, but I just used my standard rolling pin. Finally, there is a Lefse stick that is used to flip the Lefse, a special skill. I just used a spatula. So even though my Lefse were not made under authentic circumstances, they were just as delicious as I remember.

Lefse

yields a dozen 10-inch Lefse
  • 1 pound potatoes
  • 1/4 cup butter
  • 1/4 cup milk
  • 1/2 tsp. salt
  • 1 to 2 cups flour, plus more for rolling
Peel and cut the potatoes into large chunks. Place in a saucepan and cover with cold water. Bring to a boil and cook for about 15 minutes or until the potatoes are very soft and easily pierced with a fork. Drain the potatoes and place in a mixing bowl. Mash the potatoes and eliminate any lumps. Cut the butter into and mix with the potatoes. Add the milk and salt. Thoroughly blend the potatoes. Refrigerate the potatoes overnight.

Prepare a flat surface for rolling out the Lefse. Mix the mashed potatoes with 1 to 2 cups of the flour. Initially, the dough will be crumbly, but the mixture will gradually start coming together. Turn the dough out on the floured surface and knead the dough to bring it together. Divide the dough into 12 equal portions. Roll each portion into a flat and round shape. Dust with flour if the dough is too sticky.

Set a flat griddle over medium-high heat.  Cook each Lefse for 1-2 minutes on each side until speckled with golden-brown spots. Keep the Lefse under the towel to prevent them from drying out.

Enjoy the Lefse rolled up with the traditional butter and cinnamon or any topping you prefer. Enjoy!

Sunday, September 16, 2018

Strawberry Cheese Pie

I found this recipe in Mom's recipe box. Like many other no-bake cheesecake recipes, it is a great option when the weather is hot. This recipe is so easy and delicious, there is no excuse not to make it yourself. I followed the recipe and used strawberries to top the pie, but any topping could be used, such as any fruit you prefer. The pie would also be excellent drizzled with melted chocolate.

Making a graham cracker crust is simple, so resist to the urge to buy a pre-made crust. Dream Whip is a powdered whipped topping that can be found near the powdered pudding mixes in some grocery stores. Or, substitute about one to two cups of cool whip for the prepared Dream Whip.

Strawberry Cheese Pie 
  • 1 Graham Cracker Pie Shell
  • 1 package Dream Whip (prepared as directed)
  • 1 8-ounce package cream cheese
  • 1 cup powdered sugar
Prepare the Dream Whip following the directions. Cream the cream cheese and powdered sugar. Beat in the Dream Whip. Pour into the pie shell and chill for several hours. When ready to serve, garnish with fresh strawberries. Enjoy!

Saturday, September 8, 2018

Chocolate and Fresh Mint Cookies

Although this recipe is not actually a family recipe, it is made with lots of fresh mint from Mom's garden. Currently, the mint is growing out of control. Every time I visit Mom, I take home lots of mint and there is still so much mint growing. I've used the mint to flavor water and tea. I've made tabbouleh and added mint to various salads. Then, after reviewing recipes, I decided to try adding fresh mint to baked goods. This recipe is the delicious result.

With fresh mint, you can extract the mint flavoring by simmering the mint in another ingredient to be used, such as milk or butter. But, for this recipe, just add the mint leaves into the dough for a serious mint flavor. I was worried that the mint leaves would disrupt the texture of the cookie, but the leaves blend right in. It was hard to stop eating these delicious minty and chocolaty cookies. I bet that adding fresh mint to brownies or the standard chocolate chip cookie recipe would also be irresistible.

Chocolate and Fresh Mint Cookies 
1 cup butter
3/4 cup brown sugar
3/4 cup white sugar
2 eggs
1 tsp vanilla
2 cups flour
3/4 cup cocoa
1 tsp baking sodas
1/2 tsp salt
2 cups chocolate chips
2 cups chopped fresh mint

Preheat oven to 350. cream together the butter and both types of sugar. Add the vanilla and the eggs and beat until fluffy. Blend in the flour, cocoa, baking soda, and salt. Roughly chop the mint leaves. Add the mint and chocolate chips. Spoon dough onto a cookie pan. Bake for about 10 minutes. Cool on a wire rack. Enjoy!

Sunday, August 26, 2018

Homemade Ricotta

Years ago, Aunt Paula told me that making ricotta is easy. I finally got around to trying it. I don't know what I was waiting for. Homemade ricotta is easy to make and so much more delicious than store-bought ricotta. This ricotta was creamy and rich. It is excellent spread on crackers with or without other flavorings. I enjoyed this batch with some peach jam, but it would also be great with pesto and nuts, or any other topping.

This recipe yields about two cups of ricotta. The nice thing about making it is that you can control how thick or thin the ricotta will be. The longer you drain the ricotta, the thicker it will be. Also, the ricotta will firm up somewhat in the refrigerator. The liquid that drains out is whey and can be used or saved for later. The whey can be refrigerated for a few days or frozen for a few months. The whey can be used instead of milk or water in a number of recipes, such as bread or oatmeal.

Homemade Ricotta 
  • 4 cups whole milk 
  • 2 cups heavy cream 
  • 1 tsp salt 
  • 3 tbsp white vinegar 
Set large sieve over a deep bowl. Dampen two layers of cheesecloth with water and line the sieve with cheesecloth.  Pour the milk and cream into a heavy saucepan. Stir in the salt. Bring to a full boil over medium heat stirring occasionally. Turn off the heat and stir in the vinegar. Allow the mixture to stand for one minute until it curdles. It will separate into thick parts and milky parts. Pour the mixture into the cheesecloth lined sieve and allow it to drain into the bowl at room temperature for 20-25 minutes (or 10-20 minutes longer for firmer ricotta) occasionally discarding the liquid that collects in the bowl. Transfer the ricotta to a bowl discarding the cheesecloth. The ricotta may be refrigerated for up to five days. Enjoy!

Sunday, August 19, 2018

Basil Vinaigrette Dressing

Mom has always loved salads, so it is not surprising to see salad dressing recipes in her recipe box. Mom told me that her favorite is the French Village Inn Salad Dressing, which is delicious, but this dressing is good and worth trying too.

The ingredients for this salad dressing are simple and common to any vinaigrette dressing. The dressing can be stored in the refrigerator for some time, but the ingredients will separate, so you will need to allow it to sit out of the refrigerator for a few minutes before using it. I like to use a wide-mouth jar so I can either shake it or stir it with a spoon. If you have never tried making homemade salad dressing, this easy dressing is an easy way to start.

Basil Vinaigrette Dressing  

  • 1/4 cup white wine vinegar
  • 1/2 cup vegetable oil
  • 1/2 tsp. salt
  • 1/4 tsp. hot pepper sauce
  • 1/2 tsp. dried basil leaves
Combine all ingredients. Beat until thoroughly blended. Enjoy on your salad!

Thursday, August 9, 2018

Chocolate Velvet Cake with Coffee Buttercream Frosting

For MDS's recent birthday (still 39!), I made this delicious cake. I found both recipes in Mom's recipe box. The Chocolate Velvet Cake recipe calls for Chocolate Velvet Frosting, but I could not find that recipe, so I used the Coffee Buttercream frosting instead. The cake and frosting combination was meant to be. I made this cake as a layer cake, but it could easily be a pan cake. The extra effort to make the layer cake was worth it.

Chocolate Velvet Cake 
  • 1 cup semi-sweet chocolate chips
  • 1/4 cup water
  • 2 1/4 cup flour
  • 1 tsp. baking flour
  • 3/4 tsp. salt
  • 1 3/4 cup sugar
  • 3/4 cup softened butter
  • 1 tsp. vanilla
  • 3 eggs
  • 1 cup water
Combine chips and 1/4 cup water in a saucepan ad stir over low heat until melted and smooth. Remove from heat. Sift together flour, baking soda and salt; set aside. Combine sugar, butter, and vanilla in a bowl and beat until well blended. Add eggs one at a time, beating well after each addition. Blend in the melted chocolate. Stir in flour mixture alternating with the 1 cup water. Pour into greased and floured pans. Bake at 375 for 30 to 35 minutes or until a toothpick comes out clean. Cool before frosting.

Coffee Buttercream Frosting 
  • 1/2 cup scalded milk
  • 4 tsp. instant coffee
  • 1 cup butter
  • 2 cups confectioners sugar
  • 2 tsp. vanilla
Dissolve coffee in milk, let cool to lukewarm. Cream butter and vanilla. Gradually beat in sugar alternating with cooled milk  mixture.


Tuesday, July 10, 2018

Grandma's Tuna Mac & Cheese

I found this recipe in Grandma's handwriting on an index card. She titled it Charlie's Tuna Mac & Cheese. I assume she copied it from a Starkist tuna can or ad. But, this is just the type of easy casserole type meal that I am not surprised to find among Grandma's recipe. I especially liked the Italian seasoning and garlic powder in the recipe, which dressed up a fairly standard casserole with delicious flavor.

When I made this recipe, I used two no drain packets of tuna instead of canned tuna needing to be drained. I used the very basic boxed mac and cheese, but there are now many variations of mac & cheese, including different noodles and different cheese options. I stuck to the basic here.

Grandma's Tuna Mac & Cheese 
  • 1 box macaroni and cheese dinner
  • 1 (12 1/2 oz) can tuna, drained
  • 1/4 tsp. garlic powder
  • 1/2 cup shredded cheese
  • 1 cup frozen peas
  • 1/2 cup milk
  • 1 tsp. dried Italian seasoning
  • 1 Tbsp. grated Parmesan cheese
Prepare macaroni according to the package. Mix in the remaining ingredients except the Parmesan cheese. Pour into a 1 1/2 quart microwaveable service dish. Microwave on high for two minutes. Stir casserole and continue heating for 2 1/2 to 3 1/2 minutes, or until cheese is melted and mixture is heated through. Sprinkle with Parmesan cheese. Enjoy!

Sunday, July 8, 2018

Grandma Holmes's Lemon Cheesecake

On a a hot summer day, this cool and lemony dessert is a tasty treat. I found this recipe among MDS's Grandma Holmes's recipes. The recipe card has notes and changes, so I think that she made this recipe and enjoyed it. The recipe card seems to call for making two pies, but as Grandma Holmes's notes indicate, I found that the recipe make one good-sized pie.

This no-bake cheesecake is perfect for summer when you don't want to turn on the oven. The notes say to bake the unfilled crust for five minutes, but I think it is better to refrigerate the crust to get it to set. Because this cheesecake needs to set overnight in the refrigerator, it is a great make-ahead dessert. The cheesecake had a subtle and not overwhelming lemon flavor. Because the recipe used jello and sweetened condensed milk, it had more of a gelatinous texture instead of a cake-like texture that baked cheesecakes can have. Nevertheless, it is a perfect summer dessert.

Grandma Holmes's Lemon Cheesecake 
  • Graham Cracker crust
  • 1 8 oz. package cream cheese
  • 1 cup sugar
  • 1 Tbsp. vanilla
  • 1 package lemon jello
  • 1 can sweetened condensed milk
Line a pie pan with the graham cracker crust. Put the crust in the refrigerator to cool while preparing the filling. Dissolve the jello in 1 cup hot water; allow to cool until shaky, but not set. In a bowl, blend cream cheese, sugar and vanilla. Whip the condensed milk until soft peaks form. Blend in the cream cheese and jello until well blended. Pour filling into the pie crust. Refrigerate at least six hours. Enjoy!


Tuesday, July 3, 2018

Sugar Cookies

This recipe is another version of the classic sugar cookie. These simple and tasty cookies are great for any occasion. I made this batch for Tim's high school graduation party hosted by John and Laura. Despite the summer heat, the party was a great success. Tim leaves Riverside Brookfield High School behind and heads off to Illinois State University in August.

This recipe is a rolled-out and cut-out cookie. You can use any shape of cookie cutter. This time, I used a basic round shape by using a glass as my cookie cutter. The cookies are delicious plain, but also popular with frosting and sprinkles.

Sugar Cookies 
  • 2 cups flour
  • 1/2 tsp. baking powder
  • 1/2 tsp. baking soda
  • 1/2 tsp. salt
  • 2/3 cup butter
  • 1 cup sugar
  • 1 egg, beaten
  • 2 tbsp. milk
  • 1/2 tsp. vanilla
  • 1/2 tsp. lemon extract
  • Optional: sugar frosting and sprinkles
Sift the first four ingredients together. Cream butter and sugar, then blend in the egg, milk, and flavorings. Blend in the dry ingredients. Chill in the refrigerator for 2 hours. Roll dough to 1/8 inch thick on a lightly floured surface. Cut into desired shapes with cookie cutter. Bake on ungreased cookie sheet at 375 for 10 to 12 minutes. Frost, if desired. Enjoy!