Friday, March 22, 2013

Egg and Pepper Sandwiches

Egg and pepper sandwiches are a Chicago-area Lent tradition, especially among Italian-Americans. During February, March, and April, these sandwiches can be found at many hot dog stands or delis in Chicago. The sandwich is often available only on Fridays to accommodate the Catholic tradition of not eating meat on Fridays during Lent. But there is no reason to save these sandwiches just for Lent. They make a fast and easy meal any time of the year.

The name of the sandwich really says it all--egg and pepper. But pepper here means bell pepper, not black pepper. Although any type of bread could be used, the best bread to use is soft Italian rolls from either Gonnella or Turano, two major suppliers of Italian breads in the Chicago area. Any other sub-type roll could substitute if you can't find good Italian rolls, but for me, the Gonnella or Turano rolls are the best. The Italian rolls have a certain texture that is good for holding together messy sandwiches. Also, the flavor of these rolls compliments the egg and pepper well. I toasted these rolls for just a few minutes in a warm oven to give them just a little crunch.

Egg and Pepper Sandwiches

  • 2 green bell peppers
  • olive oil
  • 6 eggs
  • 2 Tbsp. milk
  • 3 soft Italian rolls
Wash the bell peppers, remove seeds and cut into two inch strips. Put a small amount of olive oil in a pan and turn on to medium heat. Add the peppers. Cook until the peppers are tender.

Meanwhile, crack the eggs into a bowl and add the milk. Beat the eggs well. Once the peppers are tender, add the eggs to the pan and stir constantly so the eggs do not stick. Cook until the eggs are done. Spoon the egg and peppers onto the Italian roll. Enjoy!

Friday, March 15, 2013

Aunt Paula's Fancy Crackers

This past Christmas, we made a trip to Michigan to visit family. Aunt Paula and Uncle Zach Holmes were our hosts for the visit. We are lucky to have such a wonderful place to stay for our visits to Michigan. Aunt Paula and Uncle Zach's home becomes a home away from home. I don't know how many times we have stayed with them, but every time we do, we have a great time and create good memories. My favorite memory involves spilled wine and an attempt by MDS and Uncle Zach to do laundry in the middle of the night. But, you will have to ask one of them for the details.

Aunt Paula always has delicious food for us, and, these crackers are no exception. Despite eating so much on Christmas, when Aunt Paula put this crackers out on Christmas, I could not stop eating them. These crackers are easy to make, but, the flavors make them fancy and delicious.

Aunt Paula's Fancy Crackers

  • 2 boxes Ritz Bits cheese crackers
  • 1 package ranch dressing mix
  • 1/2 cup cooking oil
  • 1 Tsp. dill
  • 1tsp. garlic powder
  • 1 tsp. celery salt
Put the crackers in a large zipper bag. Mix together the ranch dressing mix, cooking oil, dill, garlic powder, and celery in a small bowl. Pour over crackers. Gently shake to mix. Put in the refrigerator for 24 hours. Enjoy!

Sunday, March 3, 2013

Split Pea Soup

Split pea soup is a good meal on a cold day. Mom would usually make this with a ham bone after a big ham dinner, like Easter. But if you don't have a ham bone, you can just use diced ham. This soup is easy to make and has only a few simple ingredients. Like many soups made from scratch, it is good for a weekend meal because it does take a few hours to simmer. But the time is worth it for the delicious result. Meanwhile, you can make fresh bread to enjoy with the soup, like Mom's French Bread.

I remember that Mom and, especially, Dad liked this soup. I have to admit that when I was a kid, I was not the biggest fan of the soup. I am not even sure what I did not like about it. Now that my tastes have matured, I love this soup. I was missing out all those years when I was young.

Split Pea Soup 

  • 1 pound ham (with or without bone)
  • 1 cup uncooked split peas
  • 2-3 carrots, chopped
  • 1/4 head cabbage, chopped
  • 1 onion, chopped
  • 1 potato, chopped
  • salt and pepper to taste
Place the ham in a large soup pot and cover with water. Bring to a boil, then simmer for one to two hours hour. Skim off top. If using a ham bone, remove bone. When the bone is cool, remove and chop ham meat and return meat to soup pot. Add remaining ingredients and simmer for another one to two hours, stirring occasionally. Enjoy!

Monday, February 25, 2013

Biscuit-Topped Ground Beef Casserole

Note: this post has been updated.

This casserole is one of Mom's classics. In fact, Chris even remembered this casserole, and he likes it and once requested it as his birthday dinner. After I originally posted this recipe, Chris emailed me to correct my recollection that he did not like it. MDS, who is not usually a fan of such casseroles, actually liked this one. So, if Chris and MDS, who are both picky eaters, like this casserole, chances are anyone will. Like so many of Mom's casseroles, this one is easy to make on a weeknight. The ingredients are easy and may likely be ones that you keep around the house.

When I was young, I loved this casserole primarily for the biscuits. Mom always used store-bought biscuits, which I thought were so good at the time. Now, I think this casserole would be better with homemade biscuits. So, maybe the next time I make this casserole, I will make a batch of homemade buttermilk biscuits instead of store-bought biscuits. But this casserole tasted just like I remember it, especially the store-bought canned biscuits.

Biscuit-Topped Ground Beef Casserole

  • 1 pound ground beef
  • 1 medium onion, finely chopped
  • 8 oz. cream cheese
  • 1 can cream of mushroom soup
  • 1/2 cup milk
  • 1/4 cup ketchup
  • 1 can (8 oz.) biscuit
Preheat the oven to 350. In a skillet, brown the ground beef. Add the onion and cook for a few more minute. Reduce the heat and blend in the cream cheese, mushroom soup, milk, and ketchup. Once blended, pour into a 2-quart or 9X9 casserole dish. Bake in the oven for 15 to 20 minutes, or until the mixture becomes bubbly. Then, top the casserole with the biscuits and bake about 15 minutes more, or until biscuits are golden. Enjoy! 

Sunday, February 17, 2013

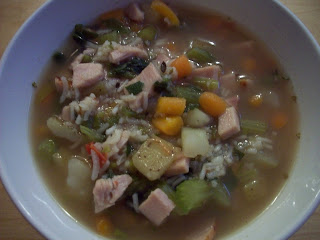
Jack's Turkey Soup

This past Christmas, MDS and I stopped at his Dad's for Christmas lunch. We were treated to this delicious homemade turkey soup. Although I have already posted my Mom's turkey frame soup, Jack's version was so good, I thought I would post this one too. Both turkey soups use homemade stock made by boiling the turkey frame for several hours. After that, you could add just about any vegetable and seasoning. But for this recipe, I followed Jack's ingredient list, including the use of rice instead of pasta.

You can use store-bought turkey stock, but using homemade turkey stock makes for the best soup. You will want to have about 12 cups of stock for this soup. If you have more, you can freeze some stock for later. If you have less, just reduce the amount of vegetables and rice. The nice thing about soup is that you really do not need to measure any of the ingredients. If you do not like an ingredient, don't add it. If there is something in this recipe that you really like, add more. As for the seasoning, this recipe calls for parsley, thyme, sage, bay leaves, oregano, garlic powder, salt, and pepper. You can use fresh or dried herbs. If you use dried herbs, use about one tablespoon. As for the vegetables, you can easily modify them as needed. I used fresh vegetables here, but you could use frozen vegetables for convenience. I never worry about adding too many ingredients because I actually prefer turkey soups like this one, which is more like a stew than a soup.

Jack's Turkey Soup 

  • Turkey carcass 
  • 2 cups cooked turkey meat, cubed
  • 3 medium yellow onions 
  • 3 or 4 carrots 
  • 3 stalks of celery 
  • 2 tomatoes (or a 16 oz can of diced tomatoes) 
  • 2 to 4 potatoes 
  • 1 cup uncooked white long grain rice (like Uncle Ben's) 
  • 1 Tbsp. chopped parsley 
  • 1 Tbsp. thyme 
  • 1 tsp. sage
  • 2 bay leaves 
  • 1 Tbsp. oregano 
  • 1/2 Tbsp. garlic powder 
  • Salt 
  • Pepper 

First, make the stock (1/2 hour prep and 4 hours cooking). After the turkey has cooled, remove all the usable turkey meat from the turkey carcass to save for making sandwiches later or for adding to the soup. Put the bones and skin into a large stock pot (if the carcass is too big for your pot, break the leftover bones to fit them all in) and cover with cold water by an inch. Add a yellow onion that has been quartered. Add 1 tablespoon salt and 1/2 tablespoon ground pepper. Bring to a boil and immediately reduce heat to bring the stock to a bare simmer. Skim the suface  to remove solids as needed. Cook for at least 4 hours, uncovered so stock will reduce (evaporate some away). At the point, the stock can be refrigerated or frozen for later use. Remove the large bones and skin from the stock pot with tongs. Pour broth through stainer lined with cheese cloth into another pot, and capture the turkey meat and bones in strainer. Discard all the bones. Reserve about 2 cups of turkey meat for the soup.

Then make the soup (45 min prep and 3 hours cooking). Wash and chop up the carrots, celery, tomatoes, onion, and potatoes. Add vegetables and turkey meat to pot with broth. Add 1 cup uncooked long grain white rice. Add seasonings: parsley, thyme, sage, garlic, bay leaves, salt, pepper. Bring to a boil and immediately reduce heat down to a bare simmer. Cook uncovered for 3 hours to reduce a little and make vegetables tender. Remove the bay leaves. Enjoy!

Sunday, February 10, 2013

Croutons

When Mom had old bread, she sometimes made homemade croutons. After making these croutons, I started to wonder why I ever bought croutons from the store. Homemade croutons are so much better than any store-bought croutons. These croutons don't take too long to make, but they do take more time than just opening a bag of store-bought croutons. So it may not be easy to make for every salad.

The recipe below is from Mom's recipe box, but it is easy to modify. I used olive oil, but another type of cooking oil could be used. I also did not have fresh garlic on hand, so I used a spoonful of minced garlic. Rather than rub the garlic on the bread, I mixed it in with the butter and oil. Alternatively, powdered garlic could be used. I also used some oregano in the second half of the croutons. Other herbs or spices could easily be added to the oil. Also, any type of bread--French, wheat, or any other--could be used. Making croutons is a great way to use stale bread, but I suppose you could use fresh bread, too.

These croutons are especially good while still hot, and many of the croutons I made for this post did not make it to the salad. The leftover croutons stored well in the refrigerator for a day. They may do fine for a few days, but I'll never know because they will be eaten well before we can test the limits.

Croutons 

  • 8 slices bread, cut to 1/2 inch cubes
  • 1 clove garlic
  • 1/4 cup oil
  • 4 Tbsp. butter, softened
Spray a griddle or frying pan with cooking spray. Rub the garlic on the bread. In a bowl, combine the butter and oil. Add other spices or herbs, if desired. Spread both sides of the bread with the butter and oil mixture. Toast in the griddle over medium heat for about three minutes per side. Enjoy!

Tuesday, January 15, 2013

Cauliflower with Mustard Sauce

When we were kids, Mom had to convince us to eat vegetables by covering them or disguising them. Nowadays, Mom mostly sautes vegetables because she is no longer cooking for a bunch of picky kids. But when we were kids, Mom usually would boil vegetables and then cover them in sauce, like the broccoli with cheese sauce. With cauliflower, I remember her always using this mustard sauce.

When looking through Mom's recipe box, I found several recipes for sauce intended for vegetables. But none of the recipes had the key ingredient: hot mustard packets from Chinese takeout. So, I talked to Mom about this recipe to learn that the hot mustard packet was Mom's inovation based on the ready availability of mustard packets from our regular takeout from Golden Wok and the nice tang that this mustard gives the sauce. Now, my version of this sauce did come out as yellow as I remember, but the hot mustard still added plenty of tang to this sauce.

Cauliflower with Mustard Sauce

  • Head of cauliflower
  • 1/4 cup sour cream
  • 1/4 cup mayonnaise
  • 1 Tbsp. lemon juice
  • 2-4 packets of hot mustard
Rinse and cut the cauliflower into small pieces. Place into pot, cover with water and bring to a boil. Cook the cauliflower for about 10 minutes or until tender. Drain and place into a serving bowl.

Meanwhile, in a small sauce pan, whisk together the sour cream, mayonnaise, lemon juice, and hot mustard. Cook over medium heat until heated through. Pour the sauce over the cauliflower. Enjoy!